Quick-Start
The Quick-Start Guide will help you with the initial setup TV Rename.
To return to this page click Quickstart Guide in TV Rename’s Help, or browse to https://www.tvrename.com/manual/quickstart.
In a nutshell TV Rename will identify, move and rename media files from one folder (or group of folders) to another folder, partially identified by the settings in TV Rename and partially identified from the file name.
Once TV Rename knows about these folders (more on this later) it will process media files and move them to the specified location.
for example: -
The file:
c:\users\me\downloads\the-outpost-s01e06-hdtv-x264.mkv
could be “renamed” to:
m:\TV Series\The Outpost\Season 1\The Outpost - S01E06 - The Book of Names.mkv
To do this TV Rename uses data acquired from The TVDB.
The initial setup can be somewhat daunting as there are many options and settings that control the way TV Rename behaves. Luckily these have sensible defaults and its actually relatively easy to get up and running providing you don’t get distracted by the settings.
The guide assumes you already have the beginnings of a Media Library - a folder (or folders) somewhere on your PC or NAS or whatever, with a bunch of tv show files in it (them). TV Rename doesn’t care how these folders are organised, however to us mere humans probably “one folder per show” or “one folder per show with one sub-folder per season” would make sense in terms of being able to (manually) find stuff later if you really need to.
Handling Network shares and USB disks
TV Rename uses the underlying Windows infrastructure to manipulate files, so if you can see a path or file in Windows TV Rename can see it as well. Both drive letters and UNC paths are supported.
For example, a mapped drive on a NAS device can be accessed as m:\ or \\nas-1\media\ (assuming m: is mapped to \\nas-1\media in Windows). Experience shows that UNC paths (if available) give better results, drive mappings can easily be broken or changed, and not using them removes an unnecessary step in generating the file or folder path.
If your Media Library uses removable media to store files the assigned drive letter changes can be a real pain. A small tweak in Windows settings will "fix" the drive letter for the device in question. There are numerous internet guides for doing this, "Google" is your friend...
The following "Google Search" link will get you started: -
Google - fix usb drive letter assignment
Add content from your Media Library
Under normal circumstances you would add a Media Library path when adding a new show to TV Rename, however TV Rename has a trick up its sleeve when adding shows already in the library’s folder infrastructure - Bulk Add Shows.
-
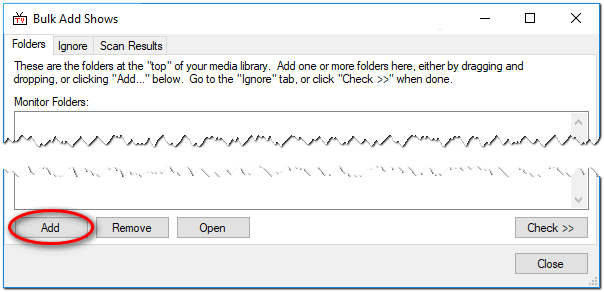
Follow the menu to Tools>Bulk Add Shows and whilst on the Folders tab of the newly opened window click
Add. Browse to the root folder of your “Media Library” and clickOK. The path will be added to the “Monitor Folders” list.If you use multiple disks or paths for your library, repeat the above step for each root path.
-
Click the
Check >>button, the selected path(s) will be scanned and any content with a recognised structure automatically displayed in the Scan Results tab. -
In the Scan Results tab, click
Auto ID Alland TV Rename will attempt to match the found content against TheTVDB, and ascertain if the show is part of a “flat” structure with all the episodes in one folder, or a “tree” structure with sub folders for each season and specials.Any shows not identified will not have an entry in the Show column or the thetvdb code column; these can be fixed manually by highlighting the relevant row in the table and clicking
Editand usingSearchto interrogate TheTVDB. -
Once the match process has finished, click
Add & Closeand accept the confirmation, all the identified shows will be added to the My Shows tab. -
My Shows will now be populated with the TV shows that have been identified, however there is currently no “Season” information. click
Refreshand all the season information will be downloaded (depending on the size of your media library this may take a little while). -
Once the download is complete you can browse the series information. Here, by right clicking on a show or season, you can edit the TV Rename settings to override information fetched from The TVDB .
-
You can manually add shows by clicking the
Addbutton in the My Shows tab. in the Add/Edit Show window that appears enter the show name or code in the” The TVDB code:” box and clickSearchto find it. Hop across to the Folders tab and enter the base folder for the show in your media library, and clickOK.
Set your Search Folders
Whilst not strictly necessary at this point TV Rename needs to know where to look for new files to move to the library when adding new episodes, so lets do it now.
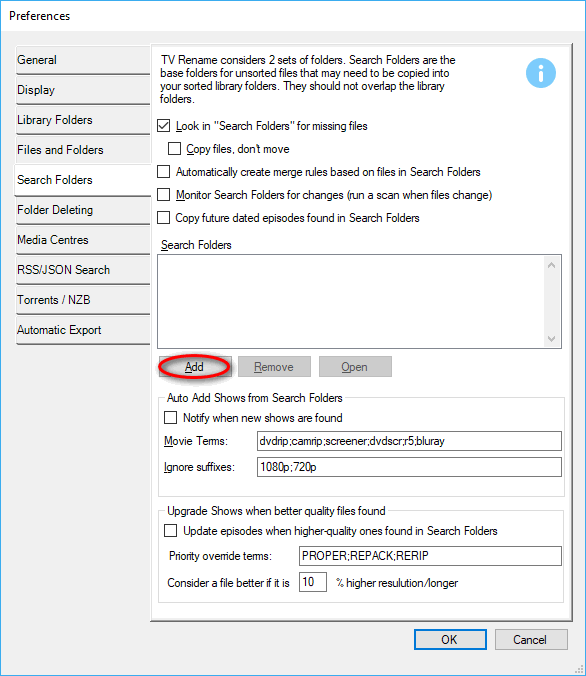
In Options>Preferences, go to the Search Folders tab and Add the locations you normally use for new episodes.
For example: I have two entries here, one points to my Downloads folder for stuff I get from the internet. The other points to my Desktop which I use as a target when ripping from my DVD collection.
Check the Filename Template
Right, so now TV Rename knows where you media library is and where to look for new files, the only thing it doesn’t know is how you want your files renamed.
Go to the Scan tab and select a show that has some season and episode data (for this example I selected the DC show “Arrow”).
Now go to Options>Filename Template Editor and you can see how the show will be named.
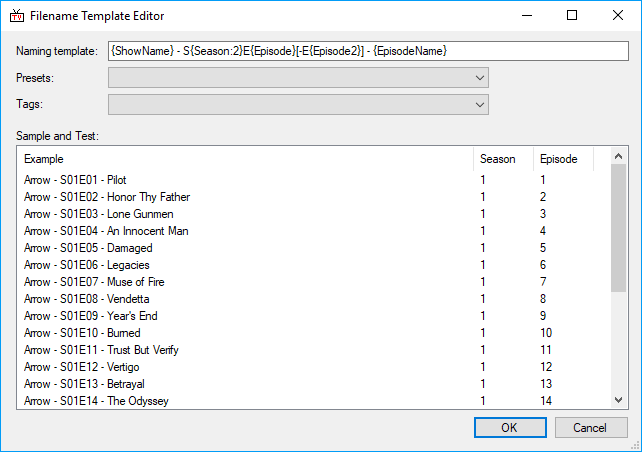
The “Sample and Test” pane shows you how the shows episodes will be named using the current naming template.
You can also experiment with other preset templates using the “Presets” drop-down.
If none of these is exactly what you are looking for you can “Roll-your-Own” using the “Tags” drop-down to modify the current template.
The basic setup is now complete. Now would be a good time to take a look at the other tabs in Options>Preferences (if you haven’t already!) to get an idea of how TV Renames behaviour can be customised.
Run a Scan
Now you’re ready to run your first scan.
Go to the Scan tab, and click Full. TV Rename will download any needed show information from The TVDB, and compare it with the contents of the media library.
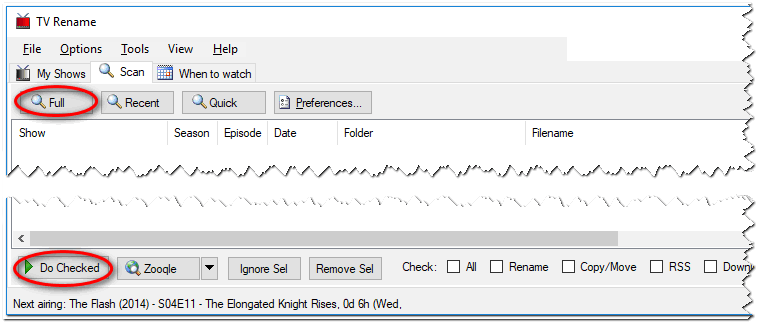
When the scan is complete, TV Rename will display its suggested changes in the main pane. Any ticked item will be actioned, so un-tick things you’re not sure about, or use the check boxes in the bottom-right of the window.
For a more “granular” approach you can right-click on selected items to see actions for that specific item.
Click Do Checked and TV Rename will process the ticked actions, moving and renaming files as necessary.
Ongoing Monitoring
Go to the When to watch tab and you will see all known future information (including air dates) for shows you are following.
In the Search Folders tab of Options>Preferences you can schedule scans, either time based (“Schedule a scan…)” or by gleaning search folder updates from Windows (“Monitor folders for changes”).
Sit back, relax, and let TV Rename do all the hard work for you!
Whatever changes TV Rename makes to your media file names the season and episode details will remain untouched.
It is highly unlikely that the names of the recordings will get screwed up, but, should it happen, the problem should be easily fixable after changing some settings, or adding new rules. At least, that’s the theory. ![]()