The User Guide
If you’re new to TV Rename you should read the Quick-Start Guide first (it’s only a 5 minute read and will help you get up-and-running).
If you need help please sign up to the forum, someone there will be happy to answer any questions you may have.
Lets (not) start at the beginning…
In true technical manual fashion we’re going to start at the end because, as is so often the case, it makes sense to see where you’re going to figure out how best to get there.
When to watch
Once you have TV Rename up and running and behaving the way you want you’ll probably spend most of your time on this tab. If you wish you can make this tab open by default by changing the “Startup” tab setting in the General tab of Options>Preferences.
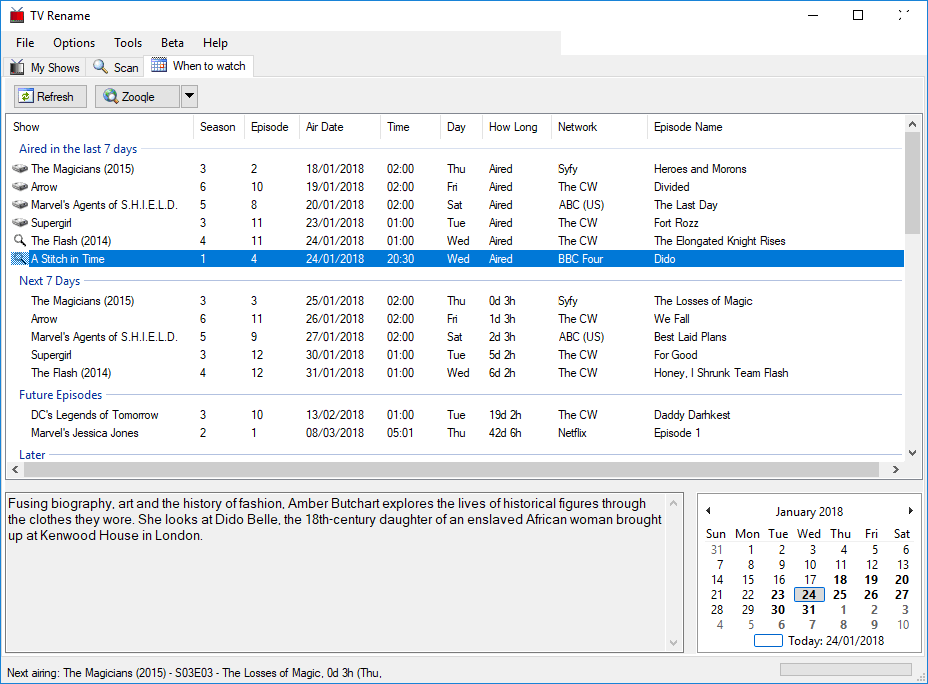
Looking at the list in the main panel we see details of recent and future show episodes matching the TV shows found in the media library.
At the top of the panel episodes “Aired in the last 7 days” are shown (you can actually modify the number of days in the General tab of Options>Preferences if you wish).
In this example there are a number of shows listed. A disk icon to the left of a show indicates that the episode was found in the media library and the magnifying glass to the left of a show indicates that the episode has aired, but cannot be found locally. Double clicking on a row thus indicated will launch your default web browser (pointing to a page of your choice - in this case “Zooqle”) pre-loaded with search parameters to look for the missing file (configured in Options>Search Engines).
The next section indicates which shows already in the media library will be airing a new episode in the “Next 7 Days”.
“Future Episodes” looks further ahead and lists the first new episode of each show found in the media library not already listed in “Next 7 Days”.
“Later” shows the rest of the future episode information matching shows in the media library that TheTVDB knows about.
The next two panels show (on the left) a summary for the episode highlighted in the main panel and (on the right) a calendar indicating the dates episodes were/will be broadcast (in bold type). The calendar interacts with the main and summary panels. Clicking on a bold date will highlight the show episode matching the date in the list above, and clicking on an episode in the main panel will cause the calendar to display that date. In either case the episode summary will be updated as well (if there is one).
As mentioned elsewhere; the content presented by TV Rename is only as good as that found at TheTVDB so please consider registering and helping to maintain their content - everybody benefits!
In keeping with our jumping-about policy lets look at My Shows next.
My Shows
My Shows displays a list of TV shows found and Identified in your media library, and is where you can manually tell TV Rename about a new TV show in the library, where it can be found and how it is structured.
In essence this tab (along with some of the preferences) allows you to configure the interaction between TheTVDB.com and your media library. Incidentally there can be multiple storage locations including local paths or drives on your computer, mapped network shares and UNC paths. The only restrictions being that a TV show cannot be spread across multiple locations, and removable USB drives should be set up so they are always assigned the same path or drive letter each time they are connected.
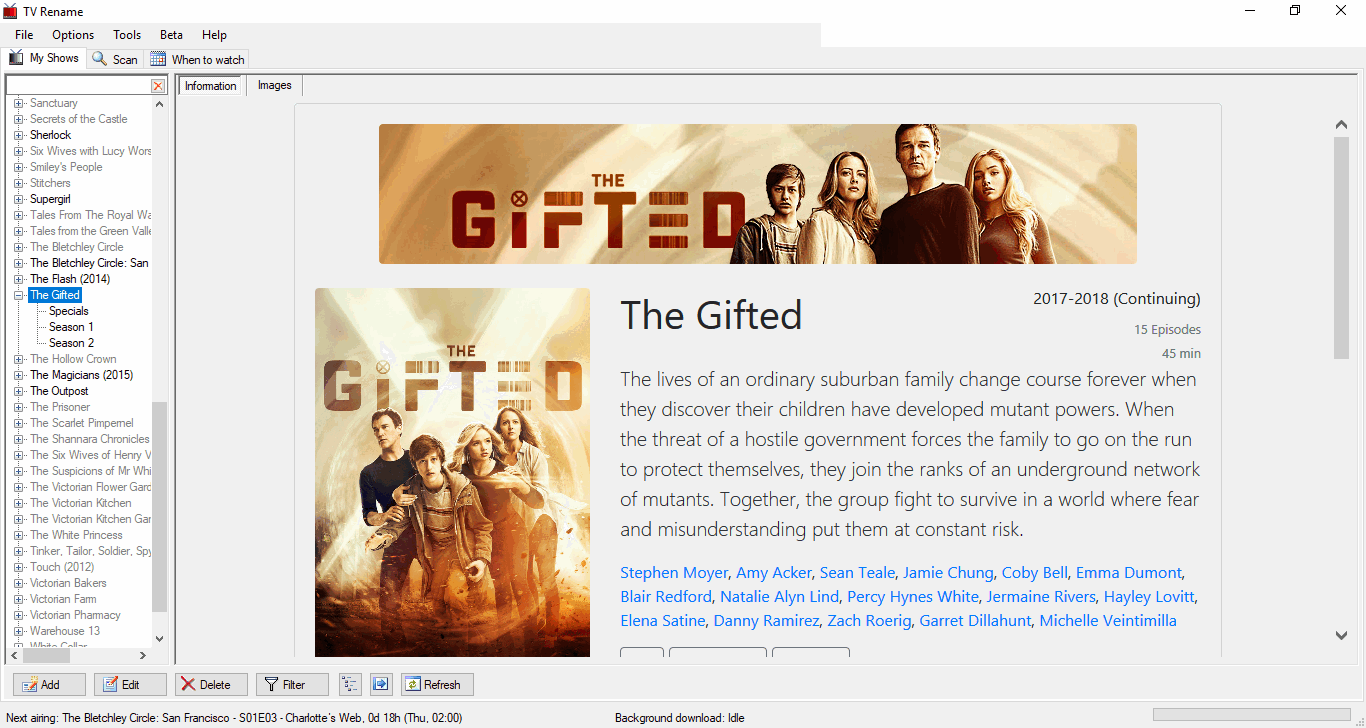
Here, you can see a number of shows listed in the left hand panel of the window. These are the shows that TV Rename is monitoring, if a show is in your media library it will have further information associated with it (its “home” folder in the media library for example, but there is much more). In the right hand panel you can read details about the highlighted show gleaned from TheTVDB.com.
There is a small “search filter” at the top of the Show List panel, typing in this box here will allow you to hide the display of shows that don’t match the text.
The right hand panel has two tabs, “Information” and “Images”, the usual setting is “Information”, however selecting “Images” displays all the cached images for a show or season of a show collected from The TVDB. Control of just what images are acquired is managed using the Media Centre tab of Options>Preferences.
Below these panels are a series of buttons which allow you to manage the content. They are: -
-
Add- Adds a new show to the list. Remember you may need to add folders to for the show separately if you need to monitor it in the media library. You don’t need to add a folder if you only want to see the shows air-dates in the When to Watch tab. -
Edit- Edit the currently selected show or season. -
Delete- Remove the currently selected show(s) from TV Rename’s database, and optionally delete the selected show(s) from the media library - careful! -
Filter- Filter the listed shows based on the entered criteria. -
Expand- Toggle between a collapsed view of the Show List (just the show names) and an expanded view (show names, seasons and specials). -
Information- Toggle between showing and hiding the (right hand) Information Panel. If the panel is hidden the Show List panel expands to fill the tab. -
Open- Opens the folder for the highlighted show or season in explorer. -
Visit TVDB- Visit TheTVDB page for highlighted show or season.
REMEMBER:
Clicking on the Add button will open the Add/Edit Show window ready to add another show.
Clicking the Edit button with a show highlighted will open the same window pre-populated with that shows details.
Clicking Edit with the season of a show highlighted will open the Edit Season Rules window - [more on this later](#edit-season-rules “Read about Edit Season Rules)…
Add/Edit Show
The Add/Edit Show window has a number of tabs of its own, they are discussed below: -
The Basics Tab
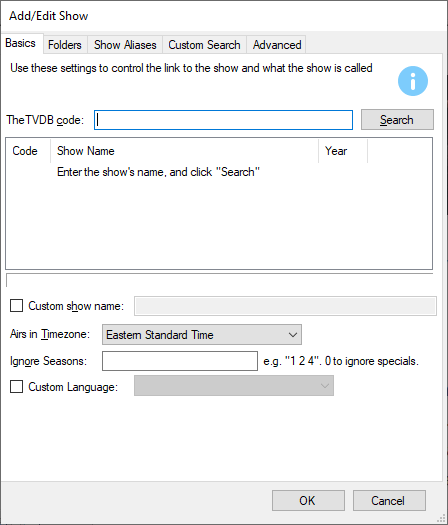
The “Basics” Tab is the starting point for telling TV Rename about a show you which to monitor.
The best way to illustrate this is with an example so lets add a show called “The Good Doctor” to TV Rename.
The first step is to tell TV Rename about the show. If you know it you can enter TheTVDB’s code for the show, otherwise type the shows name (e.g. “the good doctor”) and click on Search.
TV Rename 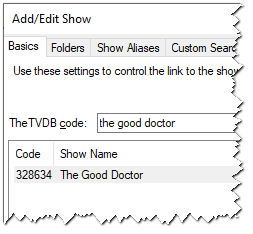 will search for matches to your entry in TheTVDB’s database, cache the results locally and display the matches. The search also works with partial show names. For example you could search for just “doctor”, but “doctor” being fairly common in TV show titles, returns over 80 results (including ours!), and you will have to delve into the list to find the one you want. Once you have found the correct show, click on it to highlight it.
If all you want to do is see the details of the show then you’re done! Just click OK at the bottom of the window and TV Rename will pull the necessary data from The TVDB to populate the My Shows tab.
Once the update is complete My Shows includes “The Good Doctor” and looks like this: -

All the Show and Season information is downloaded and the When to Watch tab will now list any future episode dates, but there are no links to the media library.
Lets go back and tweak “The Good Doctor”. Assuming the show is listed in My Shows, make sure it is highlighted and click Edit to recall the partially populated Add/Edit Show. If it isn’t listed in My Shows follow the steps above to get the show name populated and then carry on as described below.
The “Custom show name:” field allows you to change the show name in both TV Rename and the media library (except the base folder). You may like to remove “The” from names, or change extra information like the year the show was originally produced that appears with some shows. If you tick the box and enter a new name in the field provided the shows title will be replaced with this entry.
The “Airs in Timezone:” drop-down tells TV Rename that the air time from The TVDB is in that specific timezone. Most shows are in Eastern USA time, but British shows (e.g. Maigret) will be in British Standard Time. This only has an effect in the When to Watch tab which translates these times into your local timezone, or in the status bar when calculating time till the “Next Airing:”.
Default: Eastern Standard Time
If you wish to ignore specific seasons of a show enter the season numbers (space separated) in the “Ignore Seasons:” field (Entering a “0” will ignore “Specials”).
Default: Empty Field
New in Version 2.6 the “Custom Language:” tick box and drop-down allows you to set a “non-default” language for the show in question. To activate it simply tick the box and select the preferred language for the show from the drop-down.
Default: Un-ticked
To complete the minimum setup for adding the show to the library we now need to go to the “Folders” Tab.
The Advanced Tab
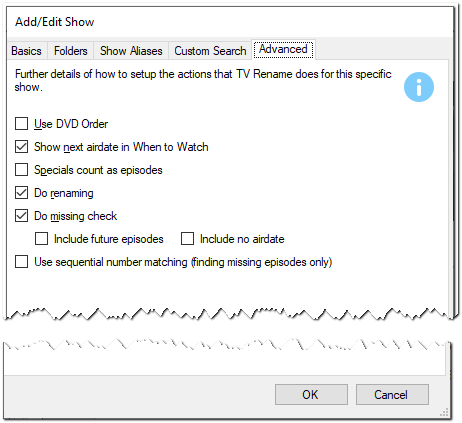 Here, you can further manipulate the way data from The TVDB is handled as it is merged into the local data.
The “Use DVD order” tick box comes into play when the episodes aired on TV in a different order to those presented on the DVD. The TVDB usually has details of these orders and this tick box allows you to choose your preference for the current show. A Really good example of this is the 1967 ITV show “The Prisoner”, which, whilst it was written as one season of seventeen episodes still causes as much controversy (and argument) over it’s running order today as it did when it was originally released.
The “Show next airdate in When to Watch” tick box toggles the display of the shows “Future” and “Later” episodes in the When to Watch tab.
The “Specials count as episodes” tick box is useful with shows such as “Mythbusters” where specials are often counted as normal episodes.
The “Do Renaming” tick box tells TV Rename to use the names built using the Options>Filename Template Editor when copying or moving files if it is ticked, otherwise they will be left unchanged.
The “Do missing check” tick-box enables or disables the ability to check for missing episodes, if the option is ticked some degree of granularity is provided by the “Include future episodes” and “Include no airdate” tick-boxes.
“Use sequential number matching” will match episodes based on their overall airing order. Because this can cause a large number of false matches, the box is un-ticked by default.
For example, Season 4 Episode 9 of Marvel’s Agents of S.H.I.E.L.D. is the 75th episode aired, so with this option enabled “Marvel’s Agents of S.H.I.E.L.D. - 75 - Broken Promises.mkv” will be seen at S04E09.
The “Manual/Additional Folders” section allows you to manually add and remove additional Seasons and associated folders.
The Show Aliases Tab
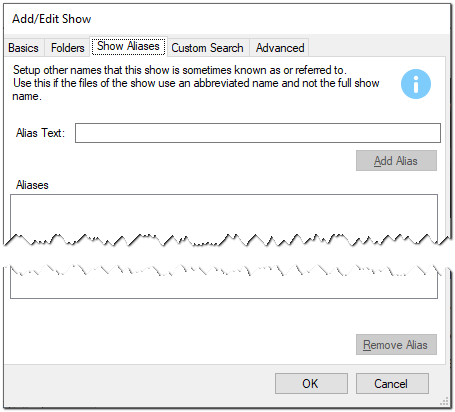 The Show Aliases tab only affects source files, it does not affect show episodes in your media library (TV Rename can work out the correct name for a file in the library from the containing folder structure and the show/season number).
Sources often rename files because of the excessive length of the shows name, for example “Law and Order- Special Victims Unit” could be represented as “L&O-SVU”. Adding “L&O-SVU” as an alias would cause any source file with that abbreviated name be renamed correctly when moved or copied into the library.
Another good example (though for different reasons) would be the BBC1 show “Doctor Who”, The TVDB correctly calls it “Doctor Who” which TV Rename will recognise, however some sources variously call the show “Dr. Who” or “Dr Who” causing some confusion. Adding “Dr. Who” and “Dr Who” as aliases for “Doctor Who” will fix this problem and everything will be correctly named “Doctor Who” when moved or copied into the library.
The Search Tab
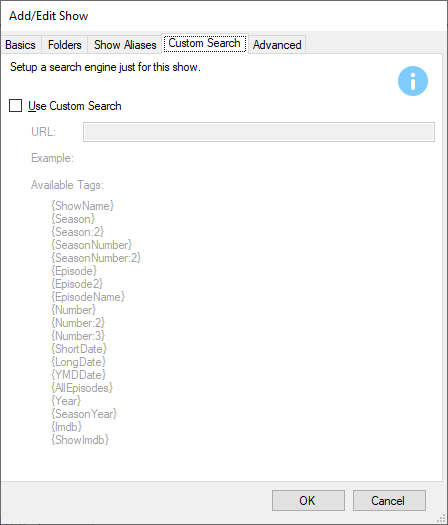 The Search Tab allows you to create a custom search for files on a per show basis.
This is useful if you collect episodes of a show that falls outside the scope of the “general” search engines and has its own genre-specific sites and searches (Japanese Anime for example).
Using the same technique and tag structure as found in the Options>Search Engines tab you can create a search specific to the show without affecting the “general” searches.
This option is disabled by default but it can be enabled for the specific show by ticking the “Use Custom Search” box in the tab.
The Folders Tab
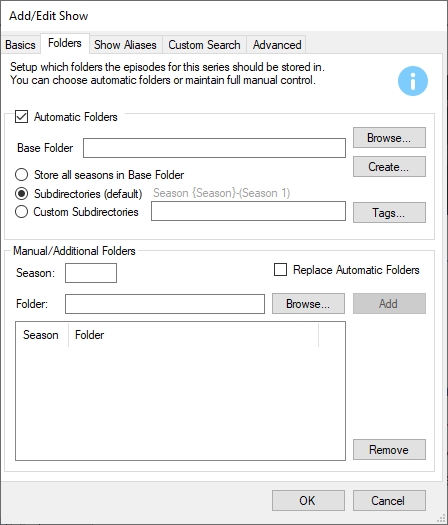
Completing the “Folders” Tab tells TV Rename about the library folder for the show. Returning to our example of “The Good Doctor”: -
If the “Automatic Folders” box is ticked the path to the base folder can be typed in the text box or filled in by browsing, but either way, now TV Rename knows the location of the shows base folder in the media library all the “really useful” stuff can begin!
The three radio buttons determine how the seasons of the show are handled: -
Selecting “Library Default” will tell TV Rename to create a sub folder for each season, naming them “Season 1”, “Season 2”, “Season 3” etc.
Selecting “Base Folder” will tell TV Rename to store all the related files in the base folder specified previously.
Selecting “Custom Pattern” allows you to specify (using text and tags) the naming of the season folders.
| Default: | “Library Default” | Selected |
If you require more granular control you can un-tick the “Automatic Folders” option and use the “Manual/Additional Folders” entries to specify the exact name and location for each season folder used by the show.
Auto Add Shows
Whilst discussing “Add/Edit Shows” it would be remiss not to mention “Auto Add Shows”.
This not-so-obvious trick in TV Rename’s functionality attempts to add video files that have been downloaded but are unknown to TV Rename to its database for inclusion in the library.
It is activated by ticking the “Notify when new shows are found” box in the Options>Preferences Bulk/Auto Add window.
For example: -
If the show file “Westworld.S01E01.HDTV.x264.mp4” exists in the downloads directory but not in TV Rename’s database and the “Notify when new shows are found” box is ticked; a scan will result in the following pop-up appearing…
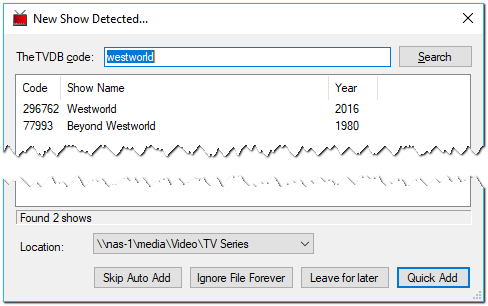
TV Rename has taken it upon itself to attempt to find the show name and look it up using The TVDB!
You now have a number of options: -
Selecting Skip Auto Add stops doing auto add for this scan for all files.
Selecting Ignore File Forever stops doing auto add on that file for this (and all future) scans.
Selecting Leave for later ignores this file for this scan.
However, if you select the matching series name in the central window (in this case “Westworld”) the “Location:” will be modified to include the show name. Click Quick Add and the file will be added to the library, prompting you to create the required sub-directories as necessary.
Auto Add uses the default settings for almost all options (so the timezone etc. may be need adjusting).
The locations used are based on those entered as part of “Bulk Add”.
Edit Season Rules
The “Edit Season Rules” pane allows you to manipulate the local data from The TVDB to suit your episode structure.
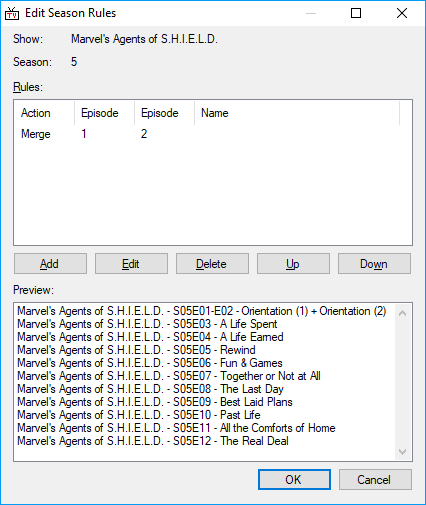
Episodes 1 and 2 of Season 5 of “Marvel’s Agents of S.H.I.E.L.D.” aired as a double episode so only one file exists, however The TVDB correctly has both episodes listed individually, so there is a conflict.
The image illustrates a rule that merges the two episodes into one. This will affect the name displayed in the My Shows tab, and the naming of the file in the media library.
The rules are applied in top to bottom order, you can use the the Up and Down buttons to move a rule.
Add, Edit, and Delete will manipulate the list as expected.
 Clicking either
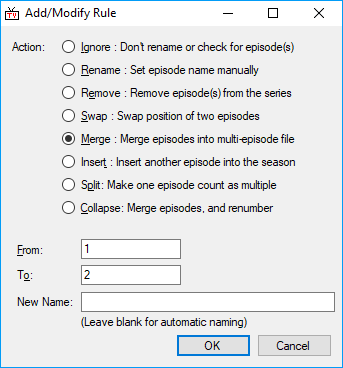
 Add or Edit will open the Add/Modify Rule pane. The only difference being Add allows you to create a new rule and Edit pulls in the data from a highlighted rule for you to change.
In this example we are editing the rule shown above. This is a two part process, firstly select an “Action:”, and secondly tell TV Rename what to apply the action to.
In this case the “Action” is “Merge”, we are merging “1” and “2” i.e. Episodes 1 and 2 of the selected season, And we will let TV Rename name the new file automatically.
The “Actions:” available are: -
| Ignore | Keep the specified episode in the guide, but don’t check for it (or rename it) on disk locally. |
| Rename | Manually set the name of an episode. |
| Remove | Make a an episode disappear. All episodes above will be renumbered down to fill the gap. |
| Swap | Swap the position of two episodes. |
| Merge | The episodes numbers supplied all in a single multi-episode file. |
| Insert | Manually add an episode into the season. Later episodes are renumbered to accommodate the change. |
| Split | Turn one episode into many. Following episodes are renumbered to accommodate the change. |
After applying a rule, go to My Shows , select the show, and click Refresh. You will then see (and can check) the effects of the rules you’ve created.
Scan
TV Rename can scan your media library looking for missing or outdated files and will try to repair any issues it finds automatically.
There are three types of scan available : -
| Full | A full scan of all shows and seasons. |
| Recent | A Scan of all the shows that have aired recently. |
| Quick | Scan the shows that have aired recently and have a missing episode in the library. Also check the locations specified in Options>Preferences>Search Folders for any matching media files. |
As with other tabs, “recent” is taken as being the number of days counted as recent indicated in the Options>Preferences General tab.
Scan indicates where there are gaps in your library. The result of a typical scan is shown below.
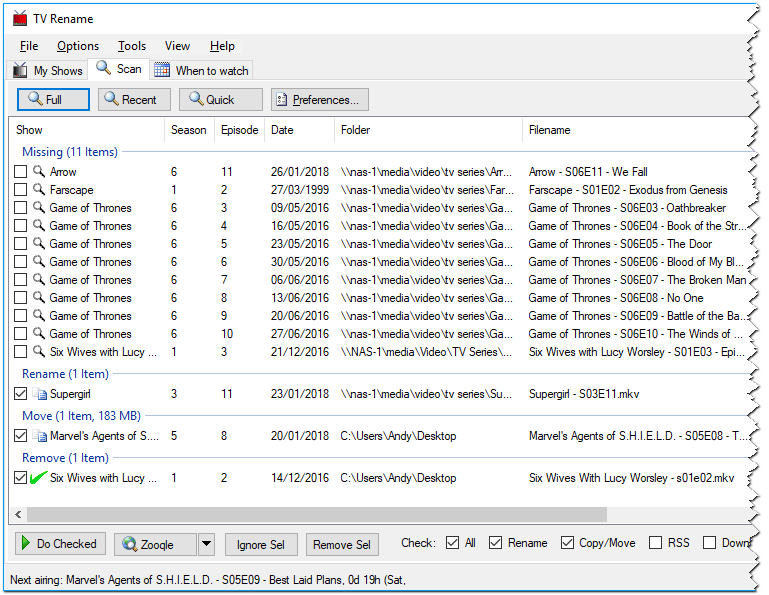
The scan indicates that there a number of missing episodes, a file in the media library that needs to be renamed, a file that has been downloaded and is waiting to be moved to the media library and be renamed in the process and a duplicate file that can be removed.
Looking at the missing episodes first; even here TV Rename is “trying to help”. Note that each entry has a magnifying glass icon to the left of the row. Single clicking one of these rows and then clicking the Web Search button (in this case “Zooqle”) will launch a search for the indicated file (configured in Options>Search Engines). Double clicking one of these rows will launch the same web search. You an also select multiple rows and then click the Web Search button to launch a browser with multiple tabs, one for each highlighted row.
If you’re having trouble finding what you’re searching for you can change the search engine to another in the Options>Search Engines list by clicking the ▼ button next to “Web Search” and selecting a different entry.
In addition to the files to be searched for, the Scan tab is also showing that there is one file to be renamed and one file to be copied or moved (see the Options>Preferences Scan Options tab). Note both items have a tick in the box icon to the left of each row.
 If the “Update episodes when higher quality ones found” box is ticked in Options>Preferences Scan Options and there are two versions of an episode file in the library and/or download location you will be prompted to choose which file to keep when the scan completes as illustrated…
When the Do Checked button is clicked everything ticked will be processed.
Note that there are some tick boxes to the right of the buttons. These give you course control over the ticked items, it this case we can toggle everything to be moved and/or everything to be renamed on and off.
There are also a number of useful options available in the right-click menu here.
Selecting files in the main scan panel and clicking Ignore Selected will remove them from the system (permanently unless they are removed from the ignore list - see Options>Ignore List).
Selecting files in the main scan panel and clicking Revert to Missing will mark (and list) them as missing. (If they are within the date range of “Aired in the last…” in the When to watch tab they will also be shown as missing there.
Selecting files in the main scan panel and clicking Remove Selected will temporarily remove them from the scan tab. They will re-appear when the scan is re-run.
In addition you can toggle individual items on or off by clicking directly on their tick boxes.
Once you are happy with everything selected click on Do Checked and the Copy/Move/Rename process will start.
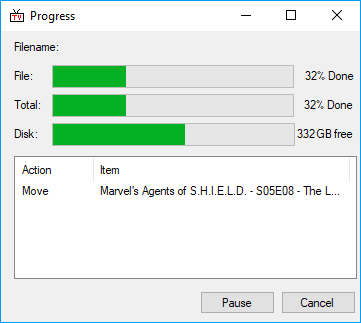 While files are being copied and/or moved, this dialog is shown. Click
 Pause to temporarily pause the copy/move operation. Click it again to resume. Clicking Cancel will stop the operation immediately. The disk space shown is for the drive that the current file is being copied/moved to.
The Status Bar
The Status Bar hides at the very bottom of the main window, quietly displaying the next show/episode airing and how long you’ve got to wait before you can watch it, and the “Background download:” status which is either “Idle” or details of what it’s doing!
Repairing Corrupt Data
Occasionally information for shows gets corrupted and needs refreshing. The quickest way to do this is a “Forced Refresh”, which comes in two flavours.
Firstly, if the problem is small, only effecting a small number of shows, right clicking a problematic show on the My Shows tab will pop up a menu on which one of the options is “Force Refresh”. Clicking this option will tell TV Rename to go to The TVDB and re-collect all the data available for that show and re-populate the local cache. This will often fix the issue.
The second solution is far more drastic in its effect.
“Force Refresh All” in the Tools menu is the “Tool of Last Resort”. If TV Rename’s representation of your media library is a real mess or the previous solution doesn’t help then this is your only real alternative.
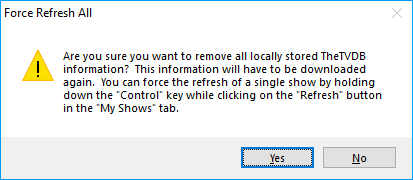 After selecting the option from the menu you are presented with the alert window (shown).
READ IT CAREFULLY AND PAY ATTENTION. If you click Yes there’s no going back, all the locally stored information in TheTVDB’s cache will be DELETED.
The My Shows tab reverts to showing The TVDB codes instead of show names, indicating that the relevant data has been deleted. Whilst still on the My Shows tab click the Refresh button and the show data will be downloaded again. (Now might be a good time for a coffee, if your library is large and internet connection slow it may take a while!)
Once the download is complete all your shows will re-appear by name.